Questions
Main Specifics

From the Questions section you can adjust the layout of the project that will be shown to the participants. Each project consists of pages and each page consists of questions. You can adjust this using the question builder module that is present in this section.
On this page you'll find detailed information, with examples, about how to use the builder so that you can easily set up your projects. We'll first cover the project's layout, and then we'll go through the different question types that you can use.
Otherwise, the main interactive elements on the page are the following:
- Button to go back to the Project Report page, described in details in the respective section of the documentation.
- Tab menu to choose the desired section of the Project Builder module.
- Button to publish any changes that were done to the project.
- Button that opens the project in testing mode, described in details in the respective article.
- Field to adjust the layout of the pages/questions in the project.
- Field to adjust a specific question.
You must click on the Publish Changes button before moving to another page in order for any changes to be saved.
Project Structure

The structure of each project is based on pages - each page on its own can hold multiple questions. When going through the project the participants will see different screens and each screen is a page from the builder. When the participants fill in all the necessary information on the screen, they can go to the next one.
You can manage the structure from the left side of the builder where each page is represented as a container, and each question is represented as a row in this container. The main interactive elements of the builder are the following:
- Button to collapse/expand the page container.
- Button to adjust the name of the page.
- Button to include new questions in the page.
- Button to delete the page.
- Button to preview the question.
- Button to adjust the question on the right side of the builder.
- Button to delete the question.
- Button to include a new page (or a page group - covered in the next section) - the button is shown above and below each page container, when you hover the area.
Page Groups
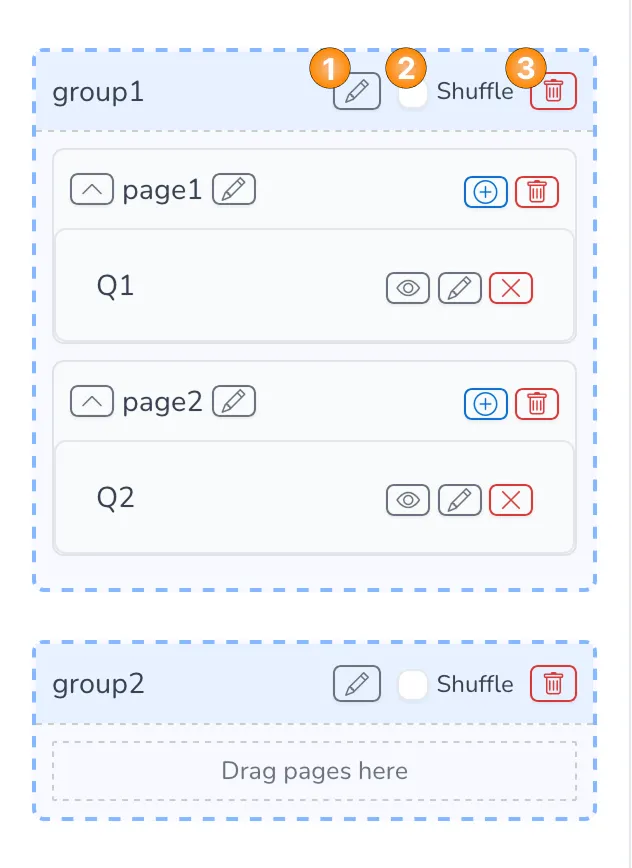
You have the option to also group pages together if you want to show them in a block where you can also shuffle them. The main interactive elements of the builder are the following:
- Button to adjust the name of the page group.
- Button to choose if the pages inside the group should be shuffled or not.
- Button to delete the page group - if there are any pages inside the group they won't be deleted this way, you can delete them individually, if needed.
Checkpoints
Another functionality of the builder is to include checkpoints at different points of the project. We use the checkpoints to classify the participants in different quota targets or to terminate them at certain points in the project.
You can add a checkpoint after each page, the same way a page or a page group is added.
To configure a checkpoint you need to click on the edit button for it and adjust the specifics in the field on the right side of the builder. In the builder you can select the quota targets with which the checkpoint will work. You can also set termination logic - either on a single question or you can group multiple questions if they are related.
Qualification Logic
In order for a respondent to be qualified for a certain quota you need to place a checkpoint and configure the relevant quota. You see a list of all available quotas in the project when you're editing a checkpoint.
The respondent will only qualify for the selected quota if they are not terminated, based on the termination logic for the checkpoint.
The quotas are described in detail in the respective section of the documentation.
Termination Logic
You can terminate the participants at any point in the project by adding a checkpoint. You can add multiple terminates in the same checkpoint, or you can also decide to add a checkpoint that will terminate all participants if they get to it.
The termination logic can be set on a single question or on multiple questions, depending on our needs. You can also use the standard logical connections AND/OR to connect different conditions.
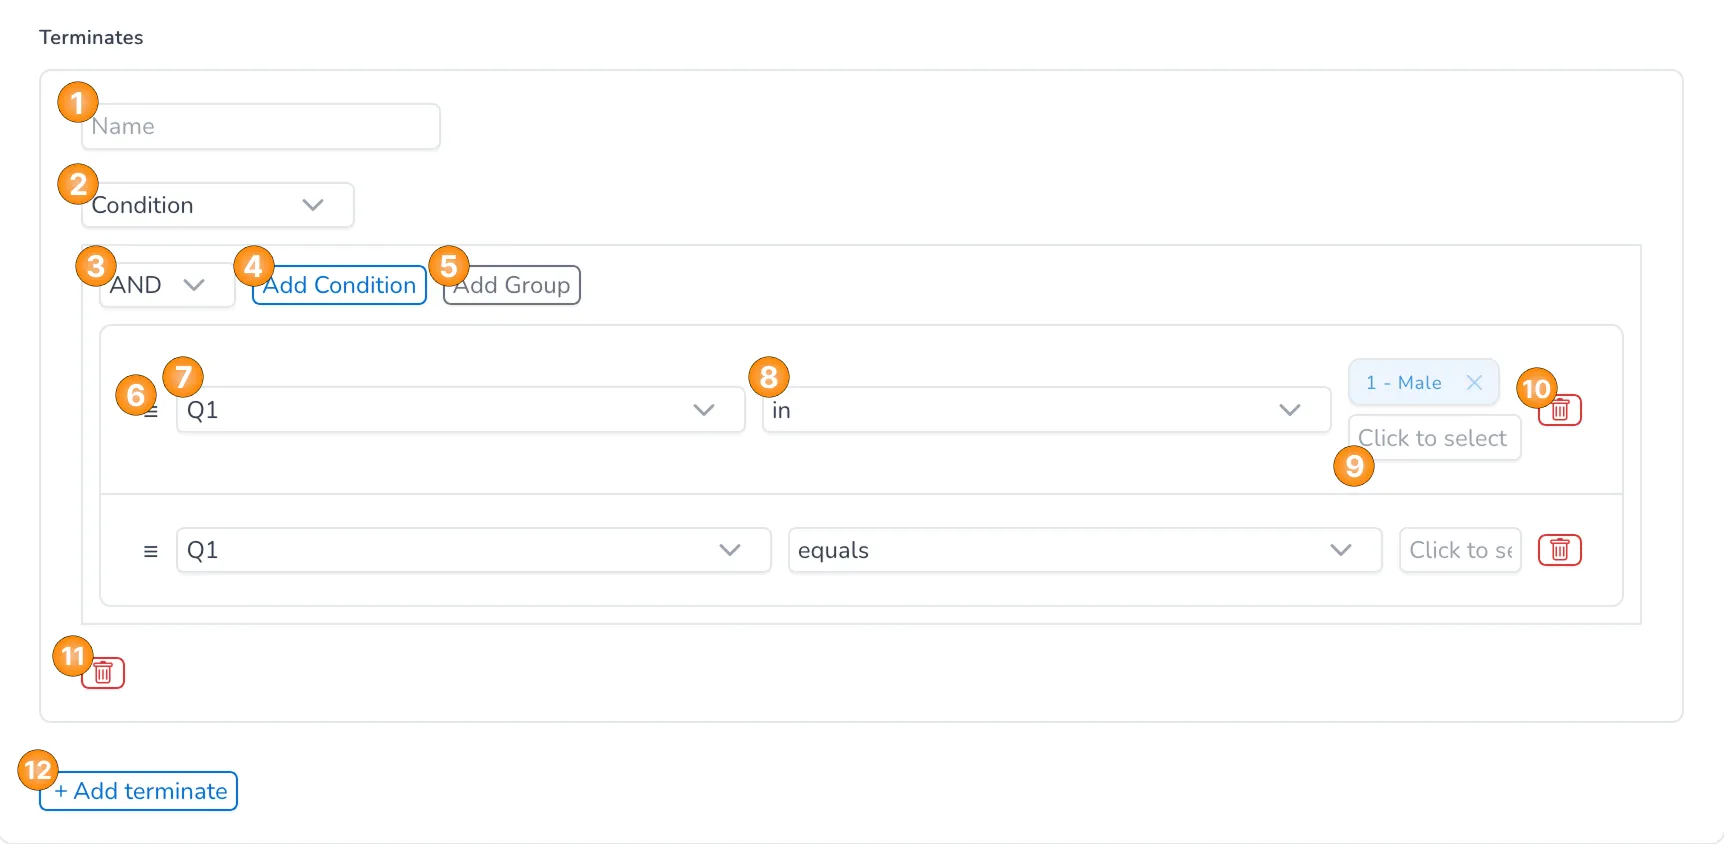
Here is the full list of interactive elements that you can use:
- Field to enter the name of the termination point.
- Dropdown to choose if the termination point should apply in all cases or if it should be based on a condition.
- Dropdown to choose the logical connection for the different conditions - it's only visible if there are at least two different conditions.
- Button to add a new condition.
- Button to add a new group of conditions.
- Element used to drag the condition up or down.
- Dropdown to choose the question on which the condition will be based - all questions from the project are available for selection, as well as the option markers which allows to set a condition on any quota markers from the project.
- Dropdown to choose the operator for the condition - the standard options are available here ("equals", "not equals", "between", etc.).
- Field to choose the specific option(s) from the question for which the condition applies - if the operator "between" is chosen in 8, then there are two separate fields here.
- Button to delete the condition.
- Button to delete the termination point.
- Button to add a new termination point.
Project Order
You can easily adjust the order of the different elements in the project - page groups, pages or questions. This is done by dragging the element in the desired place. You can do all the below:
- Change the order of a page group.
- Change the order of a page.
- Change the order of a question.
- Move a page inside or outside a page group.
- Move a question inside or outside a page.
Question Types
Using the builder you can include different question types in your project, and in this section we'll cover the specifics of each type.
- Radio
- Checkbox
- Number
- Text
- Info
- Social Media

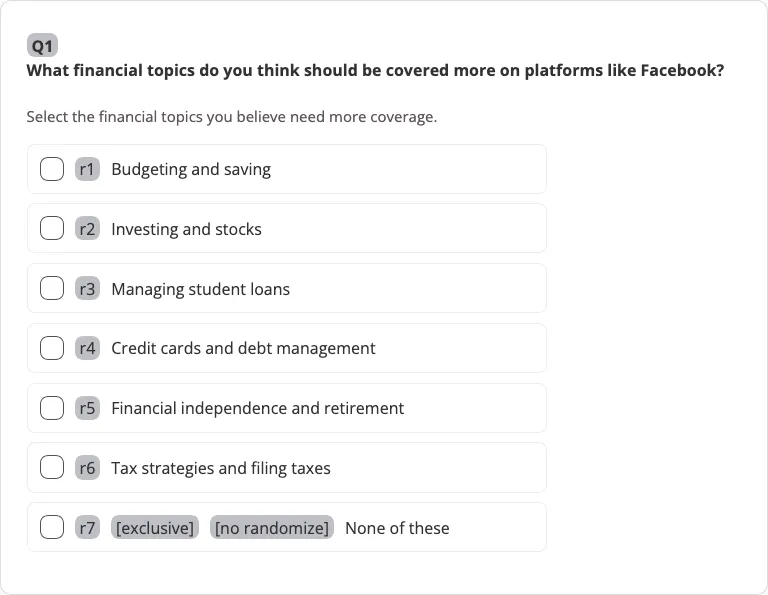
The radio question is a single select question type that enables participants to choose one answer from a list of choices. Each question has the following attributes (covered in the example above):
- Question Label: it's used to create a variable in the data for each question.
- Question Text: the question that is asked to the participants when they fill in the project.
- Instructions: the instructions that are shown to the participants to give them more clarity on how to answer the question.
- Options/Rows: the answer options the participants have when they fill in the project.
- Option/Row Label: it's used to create a variable in the data for each option/row from the question.
- Option/Row Text: the text of the answer option the participants will see when they fill in the project.

In the builder you can work with the following interactive elements:
- Field to set the label of the question, that is used to set any logic based on the question and to read the data from the exports.
- Field to set the masking logic for the question, where you have two main options - to always show the question or to set masking logic, based on different conditions.
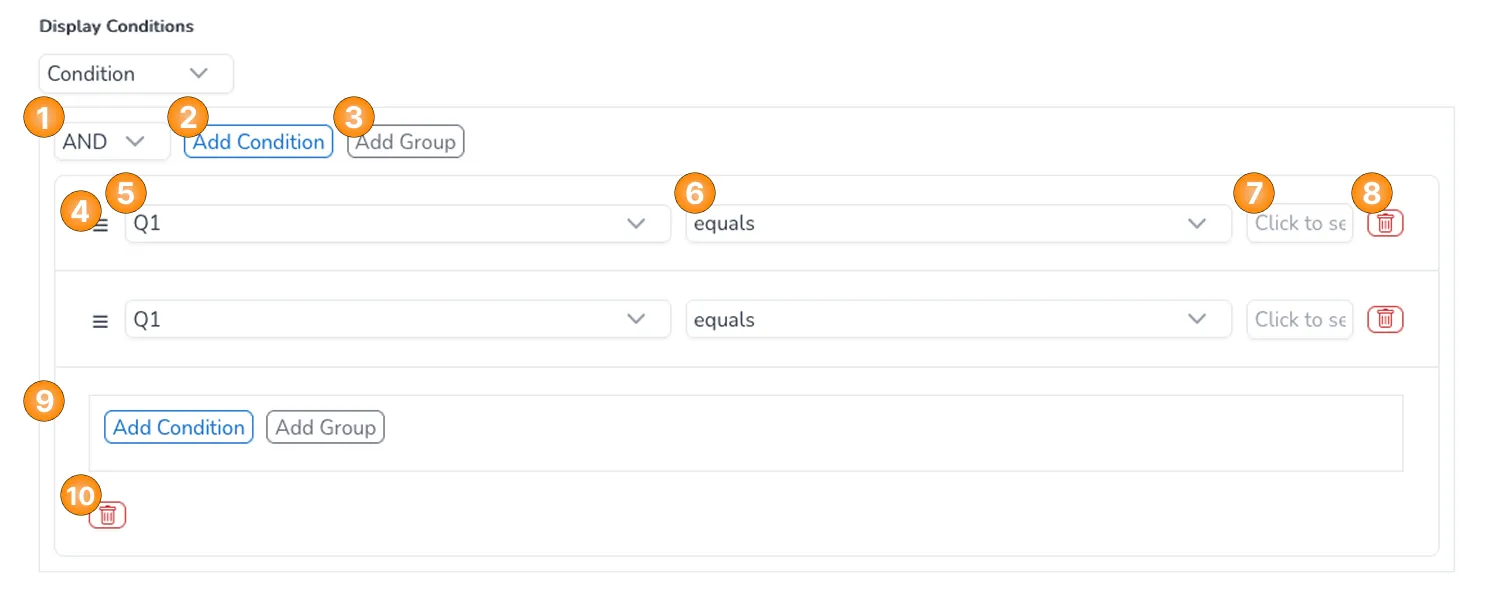 Here is the list of interactive elements that you can use to set up the masking logic:
- Dropdown to choose the logical connection for the different conditions - it's only visible if there are at least two different conditions.
- Button to add a new condition.
- Button to add a new group of conditions.
- Element used to drag the condition up or down.
- Dropdown to choose the question on which the condition will be based - all questions from the project are available for selection, as well as the option markers which allows to set a condition on any quota markers from the project.
- Dropdown to choose the operator for the condition - the standard options are available here ("equals", "not equals", "between", etc.).
- Field to choose the specific option(s) from the question for which the condition applies - if the operator "between" is chosen in 6, then there are two separate fields here.
- Button to delete the condition.
- Field to set up a group of conditions.
- Button to delete the group of conditions.
- Field to set up the question text.
- Field to set up the intructions for the participants.
- Field to choose if the options in the question should be shuffled or not - should there be anu randomization of the options.
- Field to choose if the question should be optional or not - can the participants skip the question or not.
- Field to choose if the question should be hidden or not - can the participants see the question or not.
- Field to set up the text of the option/row.
- Field to see the value of the option/row that will be shown in the data - you can only see the value, it's auto-generated and you cannot edit it.
- Field to choose if the option/row should be anchored or not - should the option be part of the randomization (based on element 5) or if it should always keep its position.
- Field to delete the option/row.
- Field to add a new option/row.
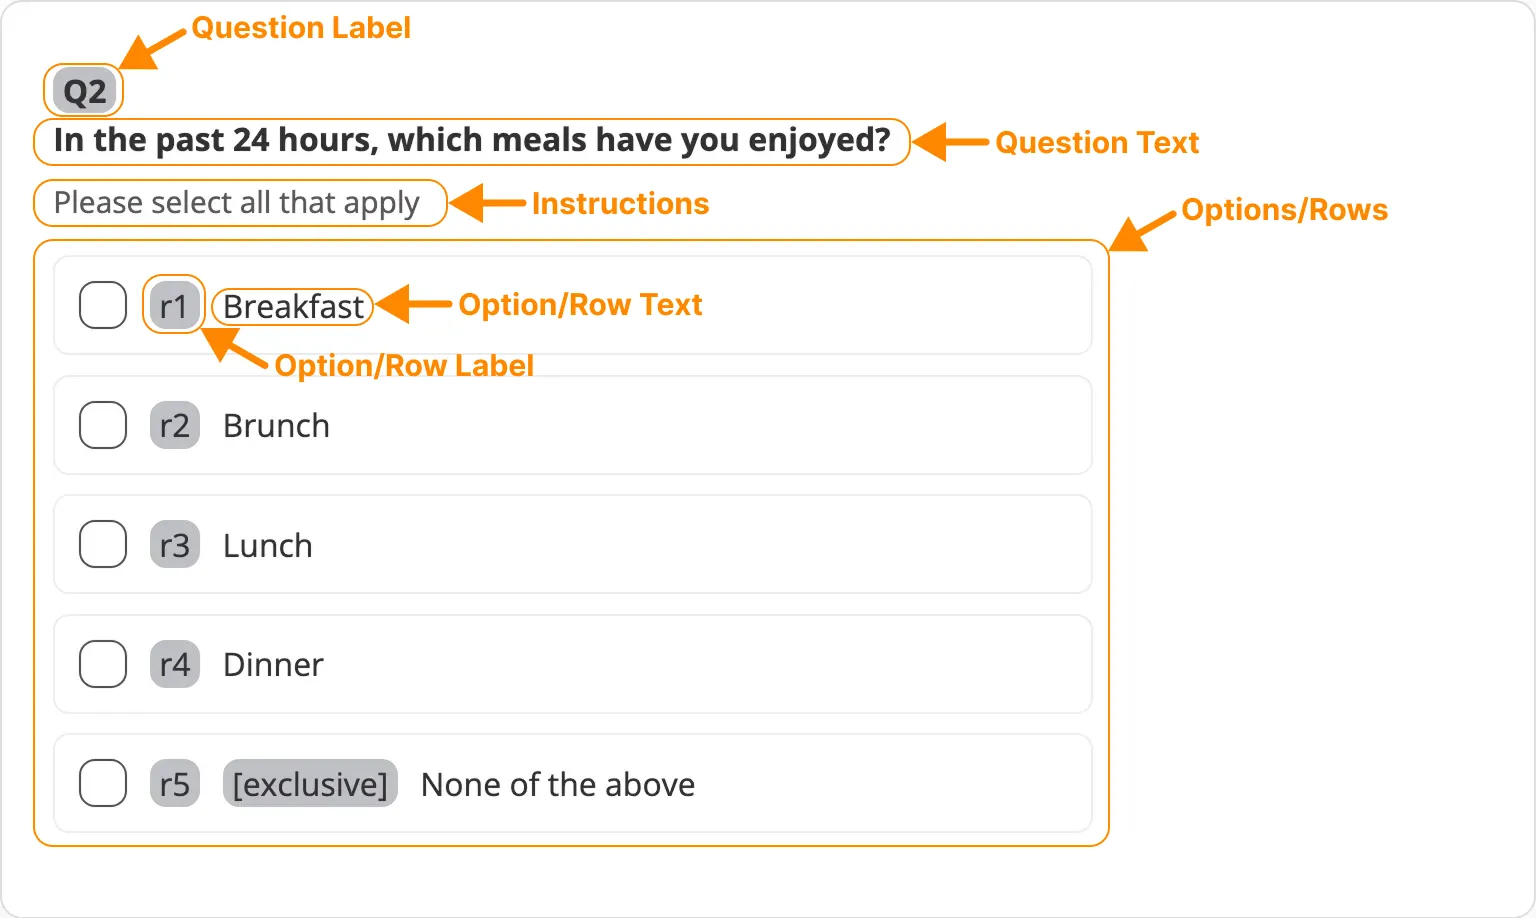
The checkbox question is a multiple choice question type that enables participants to choose multiple answers from a list of choices. Each question has the following attributes (covered in the example above):
- Question Label: it's used to create a variable in the data for each question.
- Question Text: the question that is asked to the participants when they fill in the project.
- Instructions: the instructions that are shown to the participants to give them more clarity on how to answer the question.
- Options/Rows: the answer options the participants have when they fill in the project.
- Option/Row Label: it's used to create a variable in the data for each option/row from the question.
- Option/Row Text: the text of the answer option the participants will see when they fill in the project.

In the builder you can work with the following interactive elements:
- Field to set the label of the question, that is used to set any logic based on the question and to read the data from the exports.
- Field to set the masking logic for the question, where you have two main options - to always show the question or to set masking logic, based on different conditions.
Here is the list of interactive elements that you can use to set up the masking logic:
- Dropdown to choose the logical connection for the different conditions - it's only visible if there are at least two different conditions.
- Button to add a new condition.
- Button to add a new group of conditions.
- Element used to drag the condition up or down.
- Dropdown to choose the question on which the condition will be based - all questions from the project are available for selection, as well as the option markers which allows to set a condition on any quota markers from the project.
- Dropdown to choose the operator for the condition - the standard options are available here ("equals", "not equals", "between", etc.).
- Field to choose the specific option(s) from the question for which the condition applies - if the operator "between" is chosen in 6, then there are two separate fields here.
- Button to delete the condition.
- Field to set up a group of conditions.
- Button to delete the group of conditions.
- Field to set up the question text.
- Field to set up the intructions for the participants.
- Field to choose if the options in the question should be shuffled or not - should there be anu randomization of the options.
- Field to choose if the question should be optional or not - can the participants skip the question or not.
- Field to choose if the question should be hidden or not - can the participants see the question or not.
- Field to set up the text of the option/row.
- Field to see the value of the option/row that will be shown in the data - you can only see the value, it's auto-generated and you cannot edit it.
- Field to choose if the option/row should be anchored or not - should the option be part of the randomization (based on element 5) or if it should always keep its position.
- Field to choose if the option/row should be exclusive or not - if the option is marked as exclusive, it cannot be chosen together with any other option.
- Field to delete the option/row.
- Field to add a new option/row.

The number question is an open-ended question type that enables participants to provide an integer value for one or more answer options. Each question has the following attributes (covered in the example above):
- Question Label: it's used to create a variable in the data for each question.
- Question Text: the question that is asked to the participants when they fill in the project.
- Instructions: the instructions that are shown to the participants to give them more clarity on how to answer the question.
- Options/Rows: the answer options the participants have when they fill in the project.
- Option/Row Label: it's used to create a variable in the data for each option/row from the question.
- Option/Row Text: the text of the answer option the participants will see when they fill in the project - can be left blank if there is only one option/row.

In the builder you can work with the following interactive elements:
- Field to set the label of the question, that is used to set any logic based on the question and to read the data from the exports.
- Field to set the masking logic for the question, where you have two main options - to always show the question or to set masking logic, based on different conditions.
Here is the list of interactive elements that you can use to set up the masking logic:
- Dropdown to choose the logical connection for the different conditions - it's only visible if there are at least two different conditions.
- Button to add a new condition.
- Button to add a new group of conditions.
- Element used to drag the condition up or down.
- Dropdown to choose the question on which the condition will be based - all questions from the project are available for selection, as well as the option markers which allows to set a condition on any quota markers from the project.
- Dropdown to choose the operator for the condition - the standard options are available here ("equals", "not equals", "between", etc.).
- Field to choose the specific option(s) from the question for which the condition applies - if the operator "between" is chosen in 6, then there are two separate fields here.
- Button to delete the condition.
- Field to set up a group of conditions.
- Button to delete the group of conditions.
- Field to set up the question text.
- Field to set up the intructions for the participants.
- Field to choose if the options in the question should be shuffled or not - should there be anu randomization of the options.
- Field to choose if the question should be optional or not - can the participants skip the question or not.
- Field to choose if the question should be hidden or not - can the participants see the question or not.
- Field to set up the text of the option/row.
- Field to choose if the option/row should be anchored or not - should the option be part of the randomization (based on element 5) or if it should always keep its position.
- Field to delete the option/row.
- Field to add a new option/row.
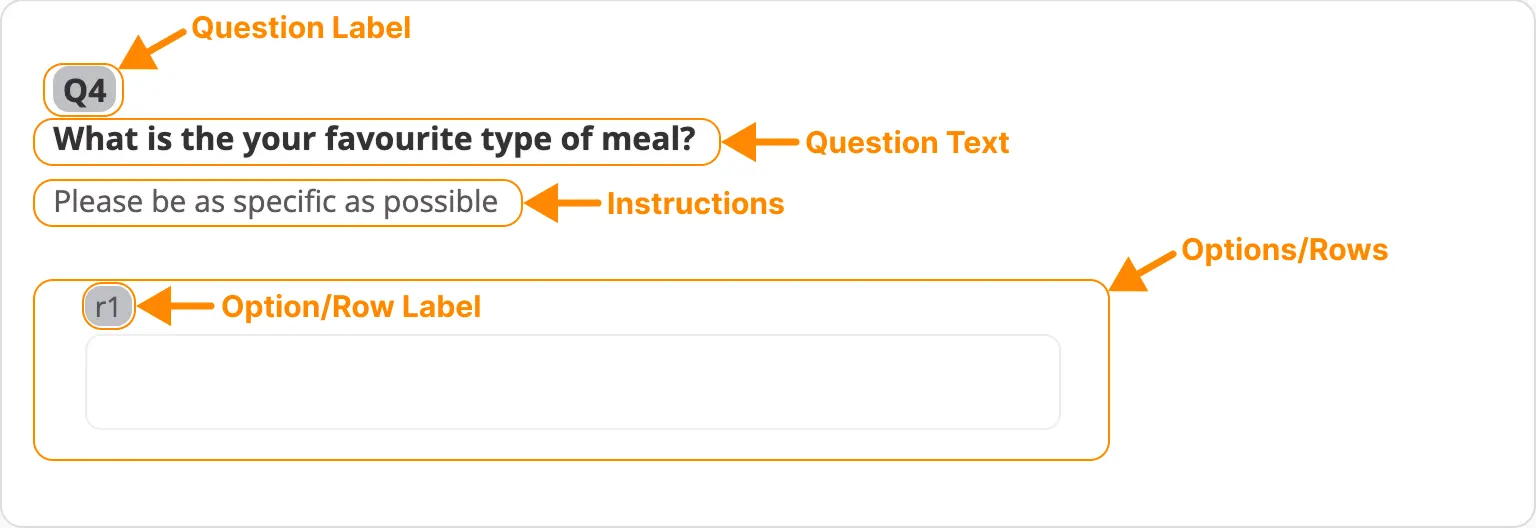
The text question is an open-ended question type that enables participants to provide an alpha-numeric value for one or more answer options. Each question has the following attributes (covered in the example above):
- Question Label: it's used to create a variable in the data for each question.
- Question Text: the question that is asked to the participants when they fill in the project.
- Instructions: the instructions that are shown to the participants to give them more clarity on how to answer the question.
- Options/Rows: the answer options the participants have when they fill in the project.
- Option/Row Label: it's used to create a variable in the data for each option/row from the question.
- Option/Row Text: the text of the answer option the participants will see when they fill in the project - can be left blank if there is only one option/row.
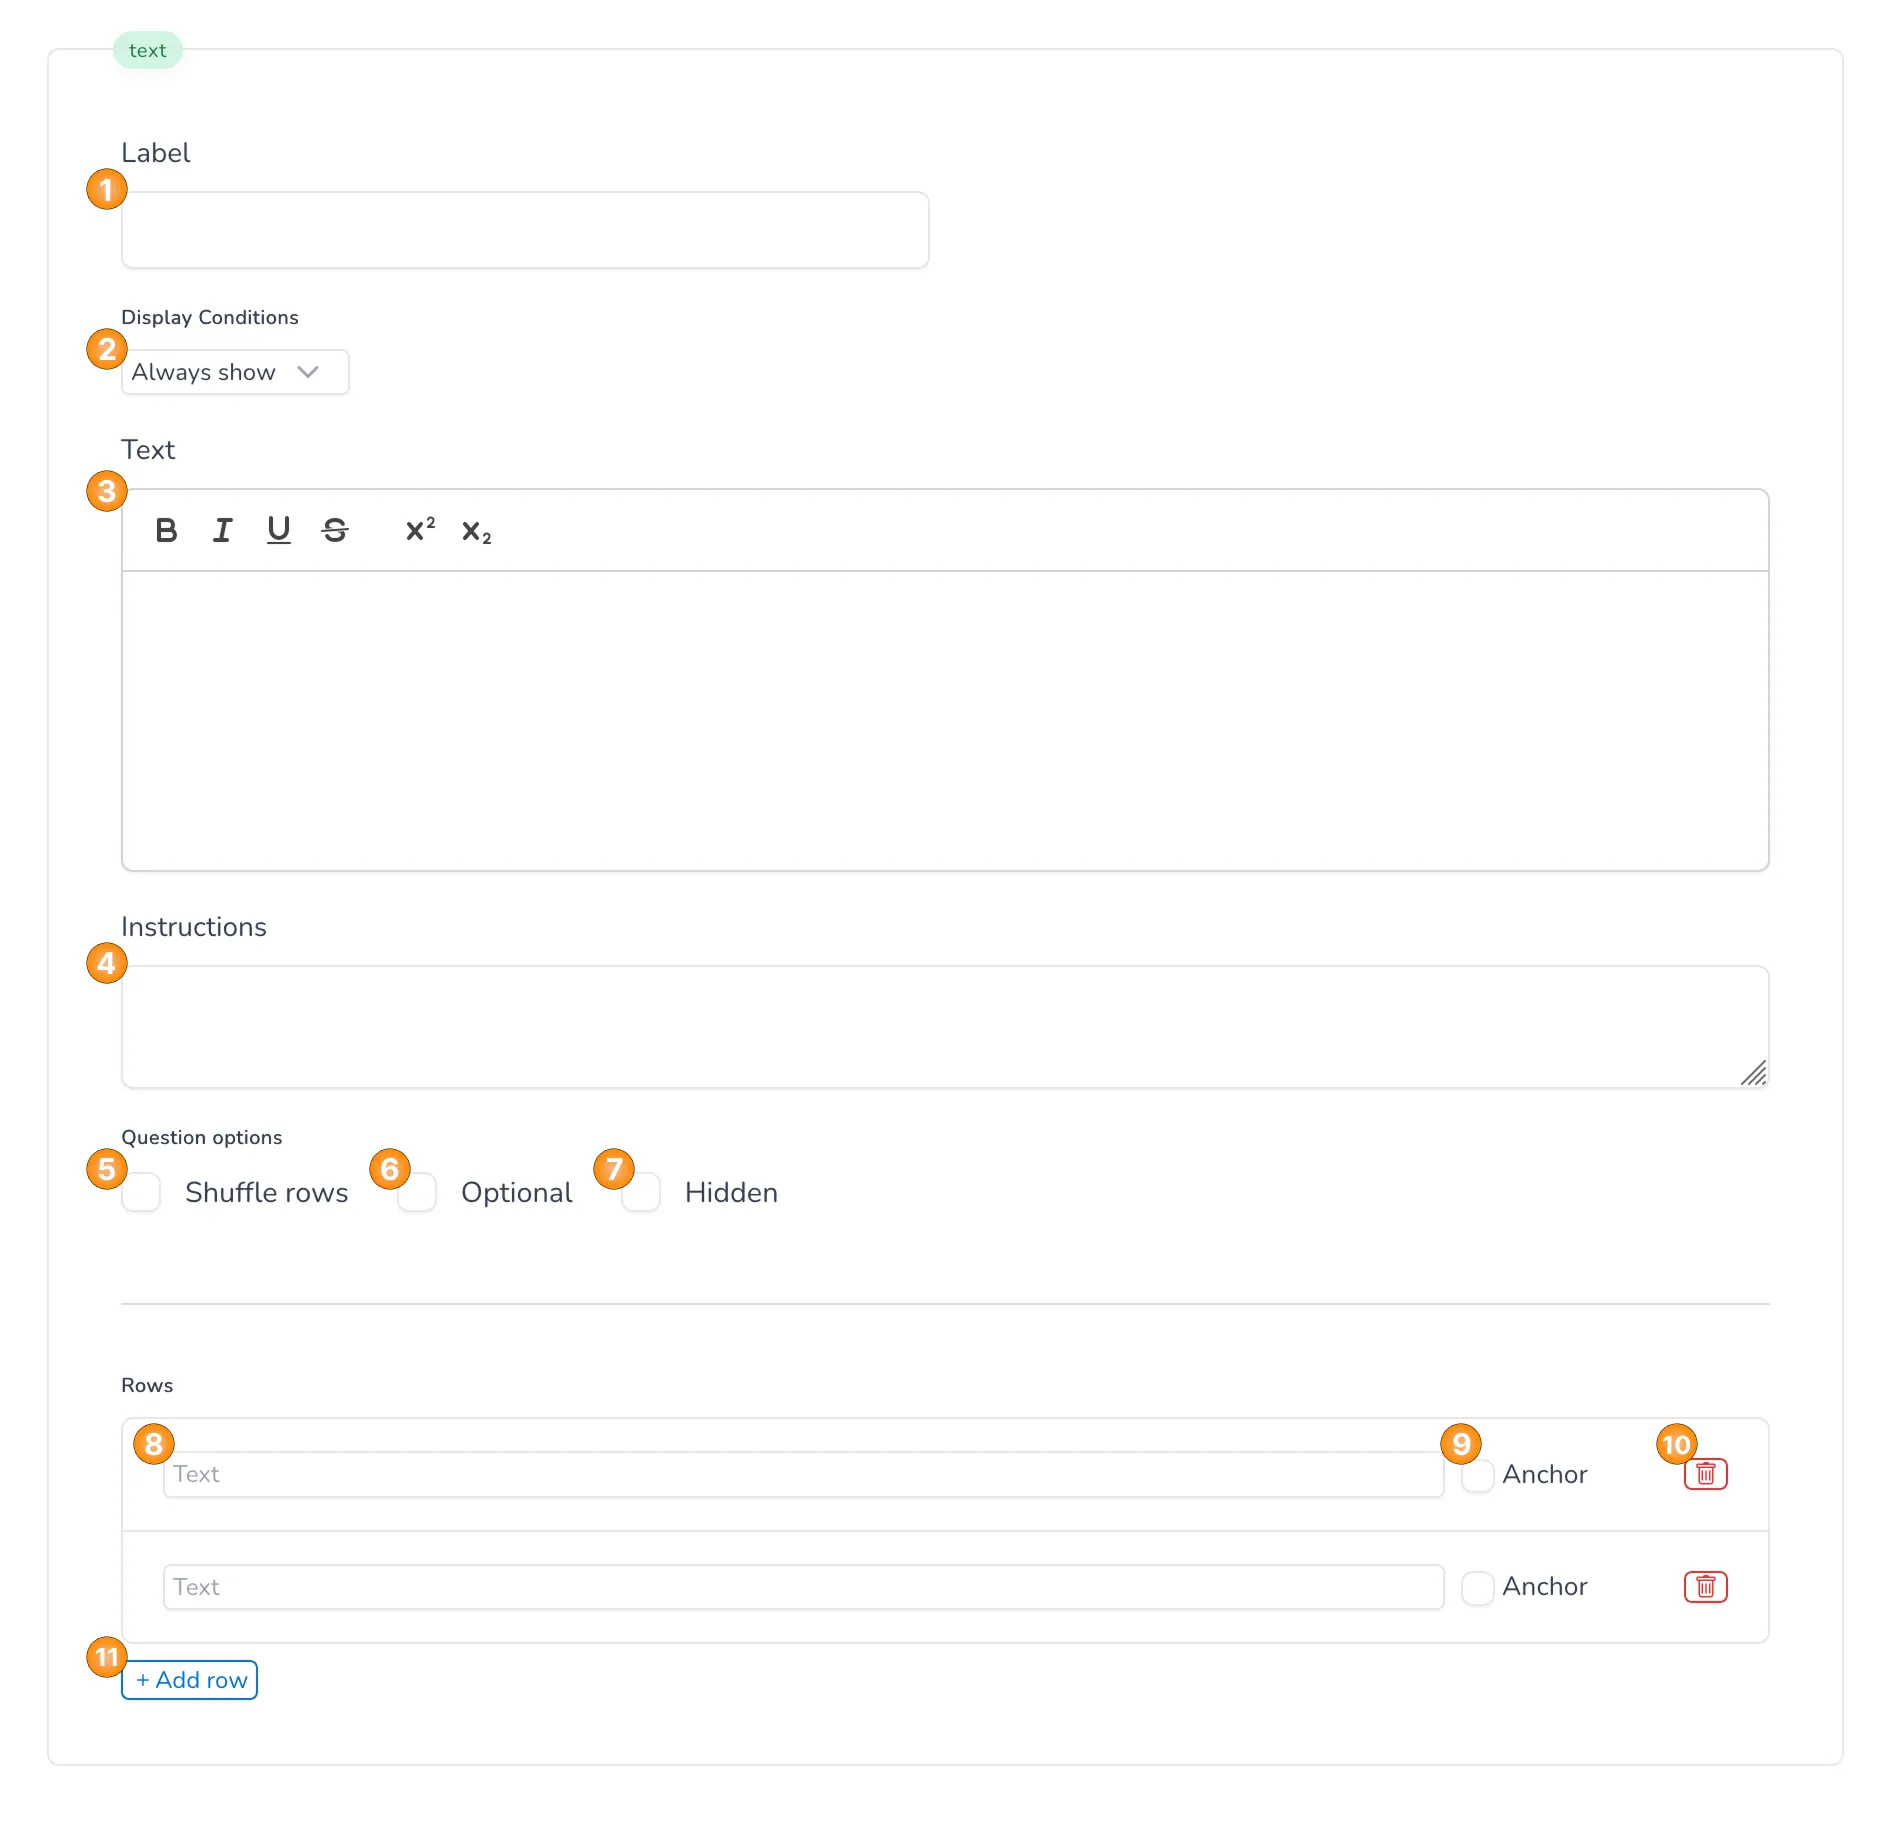
In the builder you can work with the following interactive elements:
- Field to set the label of the question, that is used to set any logic based on the question and to read the data from the exports.
- Field to set the masking logic for the question, where you have two main options - to always show the question or to set masking logic, based on different conditions.
Here is the list of interactive elements that you can use to set up the masking logic:
- Dropdown to choose the logical connection for the different conditions - it's only visible if there are at least two different conditions.
- Button to add a new condition.
- Button to add a new group of conditions.
- Element used to drag the condition up or down.
- Dropdown to choose the question on which the condition will be based - all questions from the project are available for selection, as well as the option markers which allows to set a condition on any quota markers from the project.
- Dropdown to choose the operator for the condition - the standard options are available here ("equals", "not equals", "between", etc.).
- Field to choose the specific option(s) from the question for which the condition applies - if the operator "between" is chosen in 6, then there are two separate fields here.
- Button to delete the condition.
- Field to set up a group of conditions.
- Button to delete the group of conditions.
- Field to set up the question text.
- Field to set up the intructions for the participants.
- Field to choose if the options in the question should be shuffled or not - should there be anu randomization of the options.
- Field to choose if the question should be optional or not - can the participants skip the question or not.
- Field to choose if the question should be hidden or not - can the participants see the question or not.
- Field to set up the text of the option/row.
- Field to choose if the option/row should be anchored or not - should the option be part of the randomization (based on element 5) or if it should always keep its position.
- Field to delete the option/row.
- Field to add a new option/row.
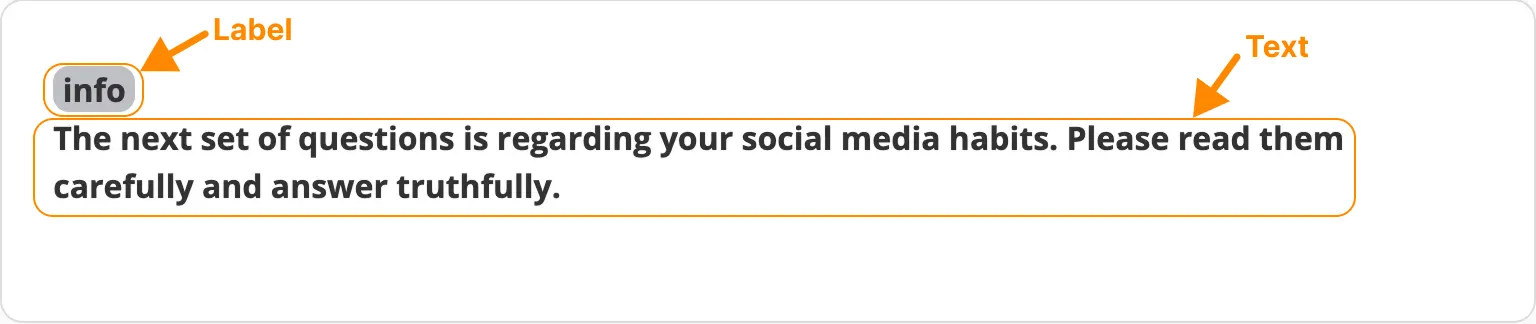
The info screen is used to display a message to the participants at a certain point in the project. Each info screen has the following attributes (covered in the example above):
- Label: it's used to create a variable in the data for each info screen.
- Text: the text that is shown to the participants when they fill in the project.
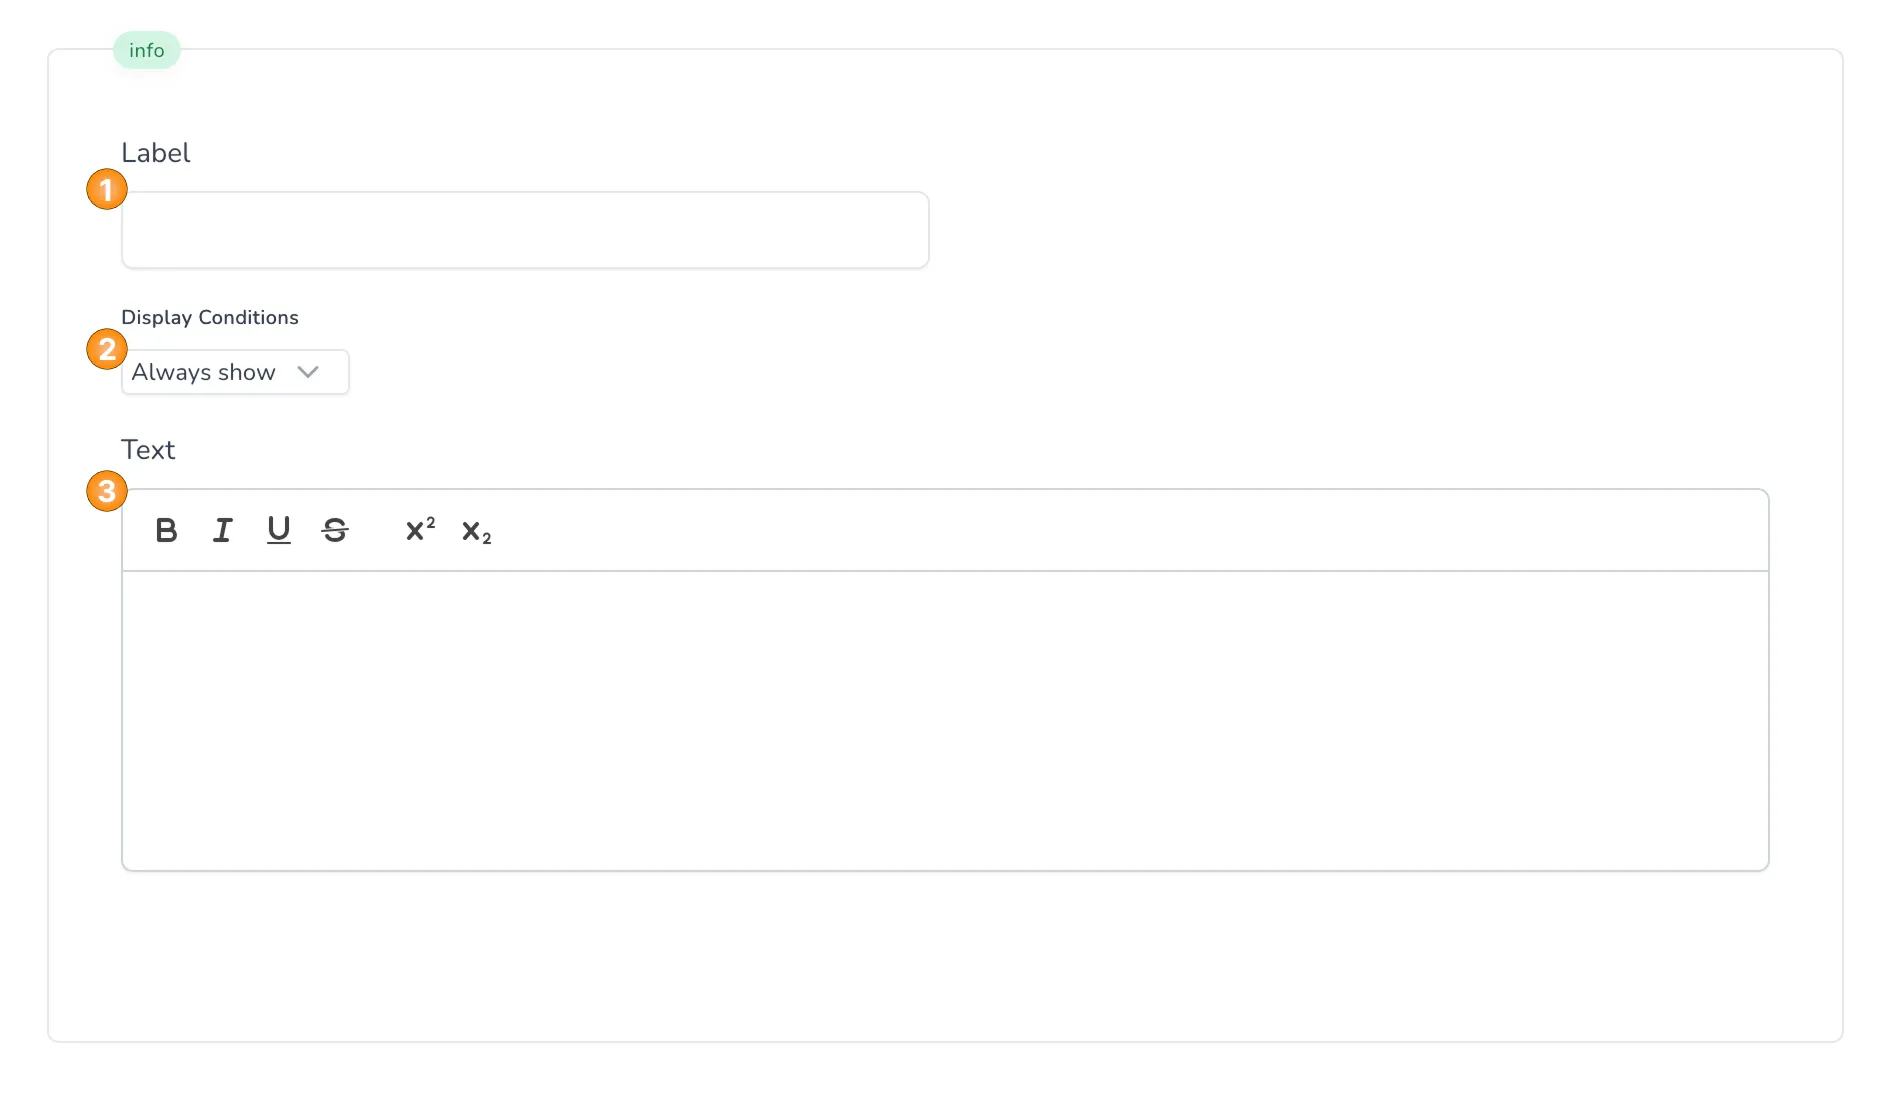
In the builder you can work with the following interactive elements:
- Field to set the label of the info screen.
- Field to set the masking logic for the info screen, where you have two main options - to always show the info screen or to set masking logic, based on different conditions.
Here is the list of interactive elements that you can use to set up the masking logic:
- Dropdown to choose the logical connection for the different conditions - it's only visible if there are at least two different conditions.
- Button to add a new condition.
- Button to add a new group of conditions.
- Element used to drag the condition up or down.
- Dropdown to choose the question on which the condition will be based - all questions from the project are available for selection, as well as the option markers which allows to set a condition on any quota markers from the project.
- Dropdown to choose the operator for the condition - the standard options are available here ("equals", "not equals", "between", etc.).
- Field to choose the specific option(s) from the question for which the condition applies - if the operator "between" is chosen in 6, then there are two separate fields here.
- Button to delete the condition.
- Field to set up a group of conditions.
- Button to delete the group of conditions.
- Field to set up the text for the info screen.
The social media question is used to track the participant's behaviour in a simulated social network setup - an example post. It has a different design than the other question types and has multiple interactive elements.

In the builder you can work with the following interactive elements, and you can see in the example above to which elements in the participant's view they correspondent:
- Field to set the label of the question, that is used to set any logic based on the question and to read the data from the exports.
- Field to set the profile image of the post's author.
- Field to set the profile name of the post's author.
- Field to set the date of publication of the post.
- Field to set the text of the post.
- Field to set up the media of the post - if there should be an image or a video, or no media at all. If you choose video, you can also choose if the participants can play/pause the video on click.
- Field to preview the uploaded media at element 8.
- Field to upload the media.
- Field to set up the number of likes for the post.
- Field to set up the number of comments for the post.
- Field to set up the number of reposts of the post.
- Field to set up the visible reactions from the likes for the post.
- Field to set up the reactions that are shown to the participants when they click on the "React" button.
- Field to set up the comments for the post.
- Field to set the masking logic for the question, where you have two main options - to always show the question or to set masking logic, based on different conditions.
Here is the list of interactive elements that you can use to set up the masking logic:
- Dropdown to choose the logical connection for the different conditions - it's only visible if there are at least two different conditions.
- Button to add a new condition.
- Button to add a new group of conditions.
- Element used to drag the condition up or down.
- Dropdown to choose the question on which the condition will be based - all questions from the project are available for selection, as well as the option markers which allows to set a condition on any quota markers from the project.
- Dropdown to choose the operator for the condition - the standard options are available here ("equals", "not equals", "between", etc.).
- Field to choose the specific option(s) from the question for which the condition applies - if the operator "between" is chosen in 6, then there are two separate fields here.
- Button to delete the condition.
- Field to set up a group of conditions.
- Button to delete the group of conditions.
Template Questions
- Default Template
- Social Media Template
The default template consists of three questions - each one shown on a separate page:


The social media template consists of nine questions - each one shown on a separate page: